Attaching Properties to this Picture
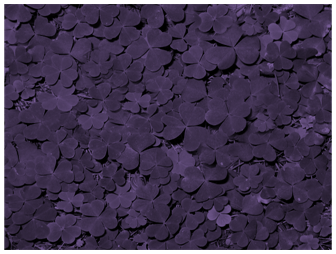
Now that the base picture has been specified, we can move on to more complicated properties, such as recolor options and picture descriptions. In the picture below, notice that the picture that was once green has been re-colored in a purple hue. This can be done by utilizing the <duotone> element, which allows for the setting of two base colors to use for re-coloring the entire picture. The first is used to act upon the darker regions of the picture and the second is used to act upon the lighter regions. This we can see below that black (#000000) is indeed used below for the darker regions while accent4 (purple in this case) is used for the lighter areas.
<p:pic>
  <p:nvPicPr>
    <p:cNvPr id="4" name="St_Patrick's_Day.jpg"
      descr="This is a Saint Patrick's day picture"/>
    <p:cNvPicPr>
      <a:picLocks noChangeAspect="1"/>
    </p:cNvPicPr>
    <p:nvPr/>
  </p:nvPicPr>
  <p:blipFill>
    <a:blip r:embed="rId2">
      <a:duotone>
        <a:srgbClr val="000000"/>
        <a:schemeClr val="accent4"/>
      </a:duotone>
    </a:blip>
    <a:stretch>
      <a:fillRect/>
    </a:stretch>
  </p:blipFill>
  <p:spPr>
    <a:xfrm>
      <a:off x="1346200" y="914400"/>
      <a:ext cx="3657600" cy="2743200"/>
    </a:xfrm>
    <a:prstGeom prst="rect">
      <a:avLst/>
    </a:prstGeom>
    <a:noFill/>
    <a:ln>
      <a:noFill/>
    </a:ln>
  </p:spPr>
</p:pic>